Frontend vs. backend
At a high level, web (and mobile) applications are built from a few components:
- Frontend: The part of the app that you interact with, like text, images, buttons, forms, etc.
- Backend: The part of the app that stores, organizes, and acts upon data.
The database is a piece of software that the backend uses to store data.
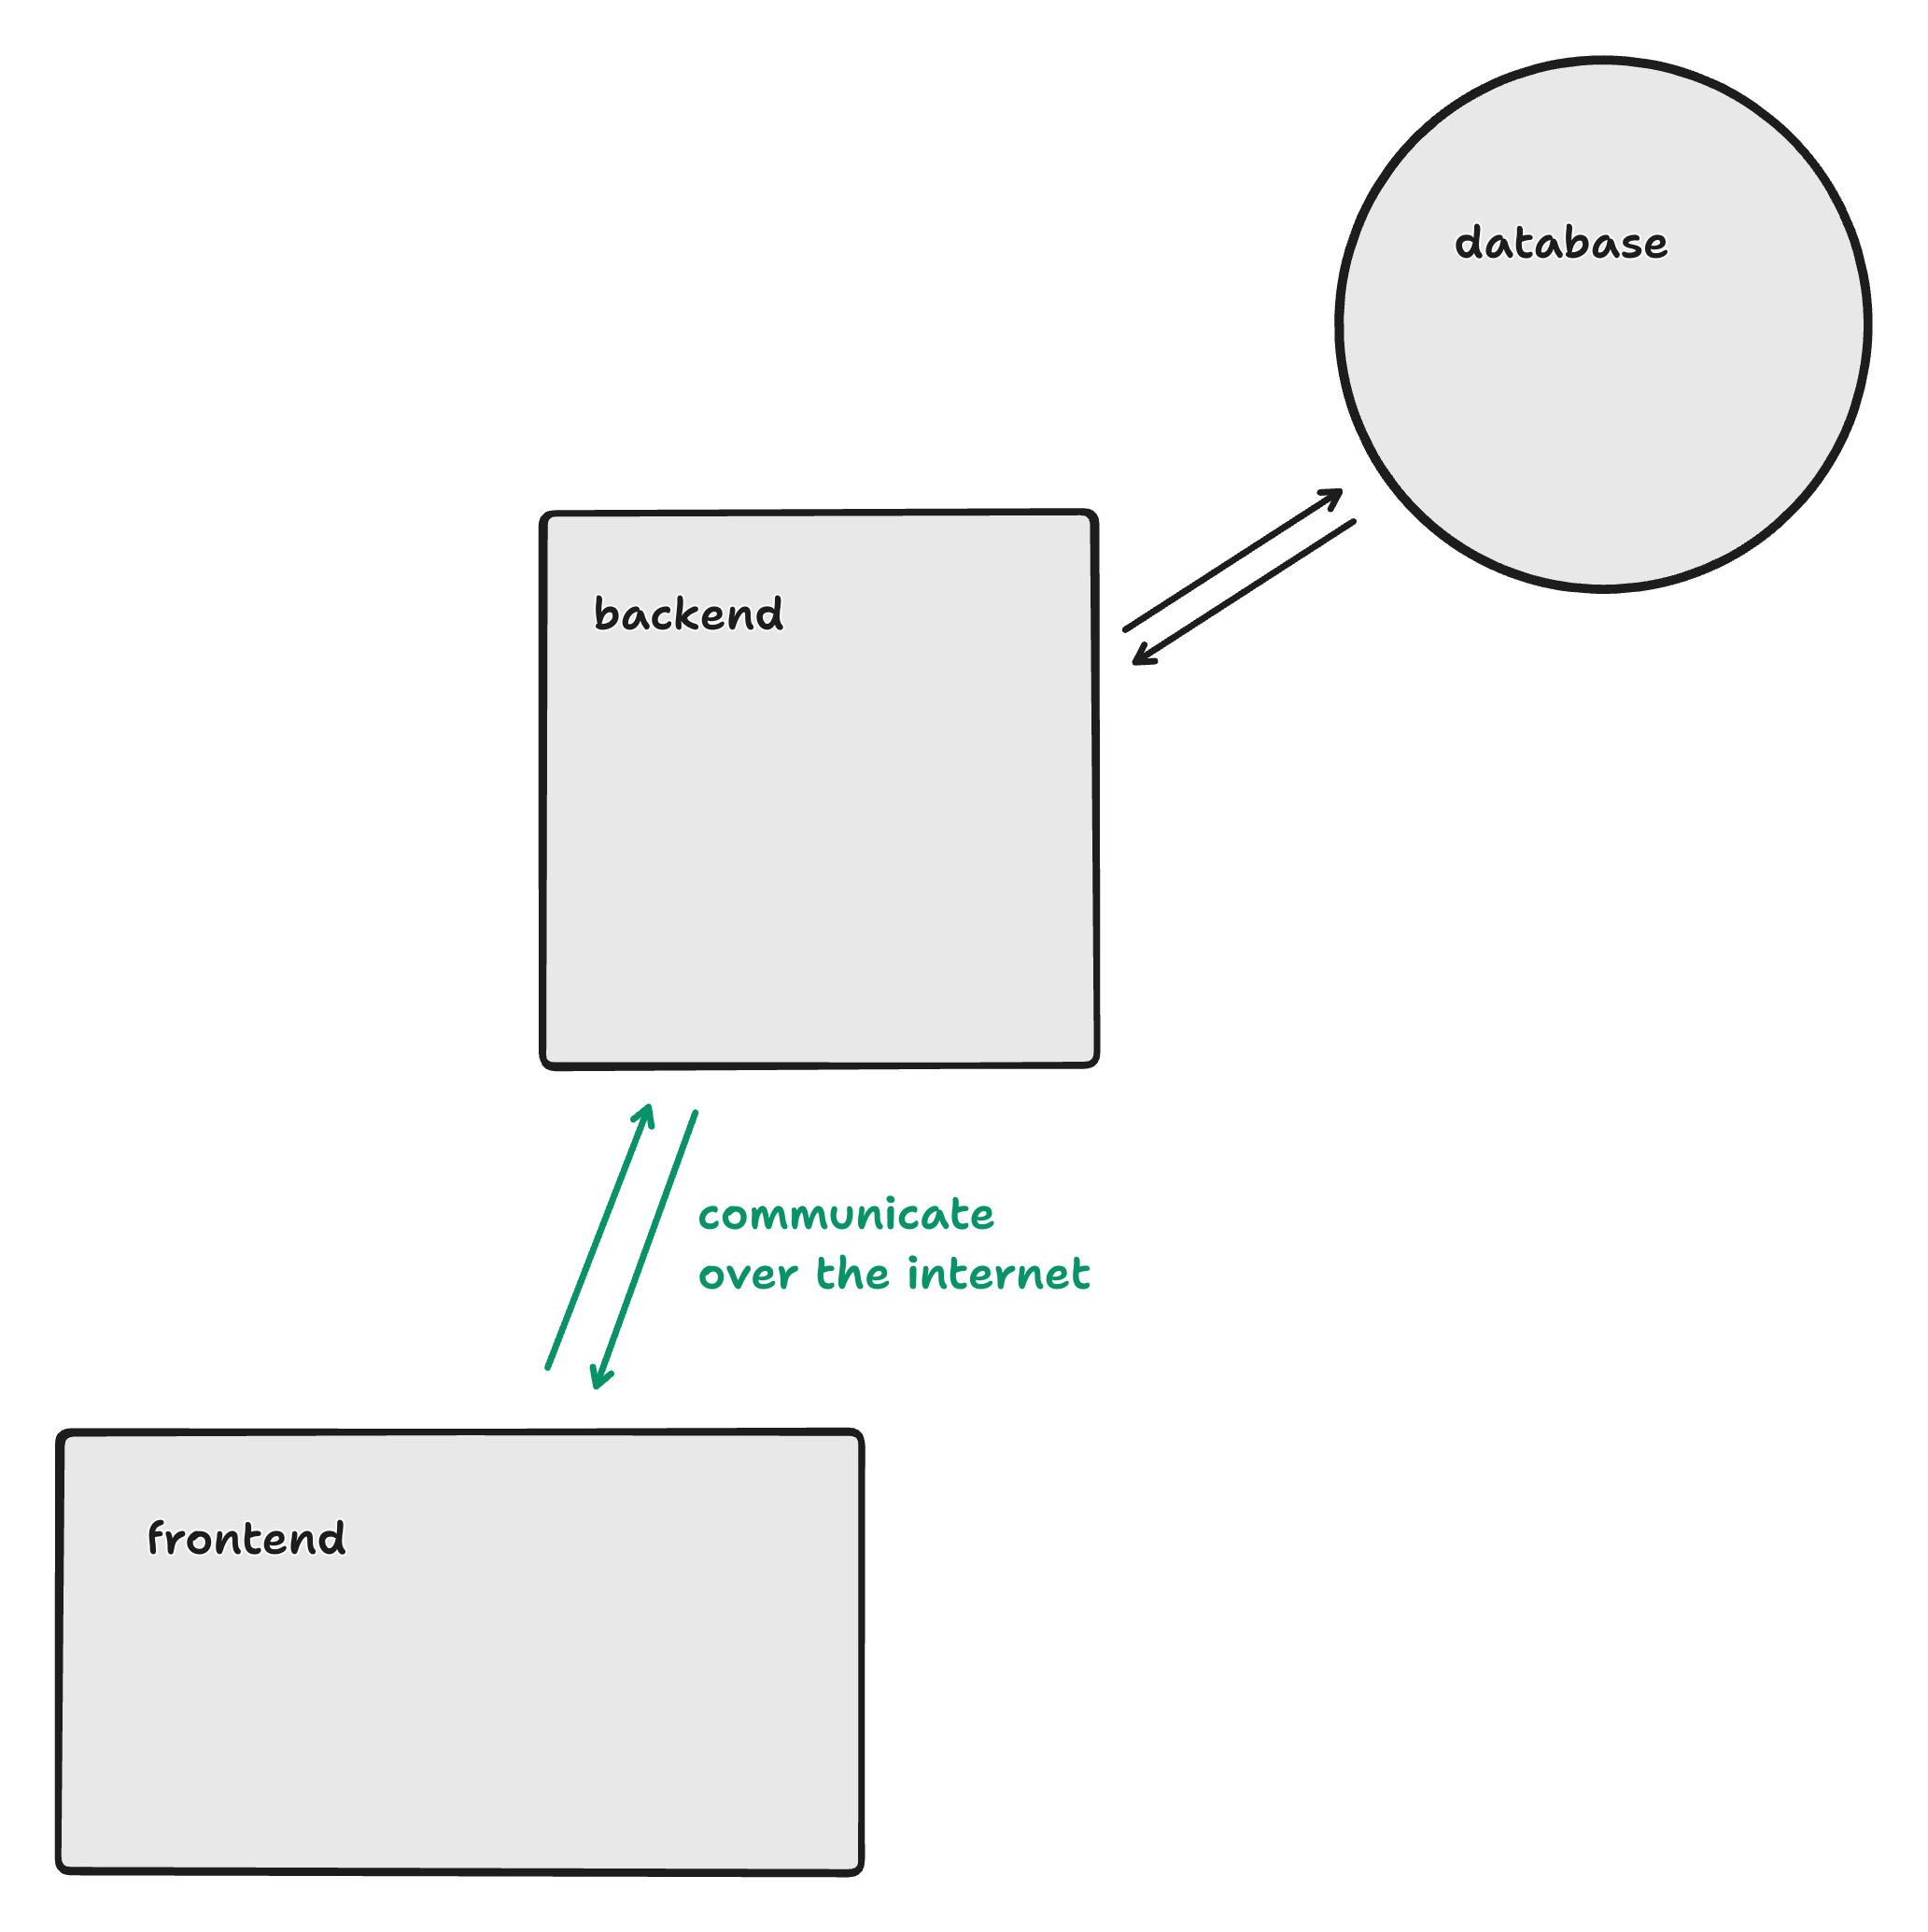
The frontend and backend are two separate programs, which run on two separate computers:
- The frontend is a program that runs on each user’s device, creating a visual interface for the user to interact with and responding to actions (like a button being pressed, or text being typed).
- The backend is a program that runs on servers, and responds to requests from your frontend program. Each request can trigger some work to be performed on the server (like saving data that was sent to it), and the server has a chance to send a response with some data back to the frontend.
What’s a server?
The word server makes it sound big and fancy, but a server is just a computer. In fact, you could turn your computer into a server.
For web applications, the backend is an app that runs on a server computer somewhere out there (managed by someone who you pay a couple bucks per month to rent some space on their computers). This app awaits requests from your frontend app, as the frontend is running on your users’ devices.
Generally, servers are kept in one place, so they can reliably stay connected to the internet. They might run a more basic operating system, like Linux, and have no screen or keyboard. But still, it’s just a computer.
The Central Dogma (for web apps, at least)
- A user loads up your frontend program, and some computation occurs on the device in their hand to show a button on the screen.
- The user presses the button, which triggers a request to your backend program, over the internet. Your backend is running on a server, and accepts this request. The backend knows what to do with this request: to tell the database to increase a counter number by 1, then to ask the database for the new count, and then to reply to the frontend’s request with this count.
- The frontend receives the response to their request, and does some computation on the device to display this number to the user.
Git and GitHub
The world today builds software using a tool called Git. It's a tool for version control, which means that it manages different versions of your code. It maintains the full history of your changes, and you can go back to prior versions at any time. You can also "branch" the folder of code and build your changes while a teammate makes their own changes, without you working on top of one another, and then eventually "merge" each of your branches back into the main codebase.
There's a subtle difference between Git and GitHub: Git is the version control tool, and by itself keeps track of your history on your computer. But if you want to work with other people, GitHub allows you to "push" your local changes to a central spot, so your team can access your changes. So the history of the codebase is on your computer (managed by Git), where you can work with it, and in the cloud (on GitHub's servers) so that everyone has the same changes.
Logging in to Git on your computer
It can be a bit tricky — follow this guide.
GitHub PR flow
What is a PR?
A PR in GitHub is a Pull Request — you requesting that code from your branch gets pulled into the main branch, so your changes get merged into the working codebase.
Before that happens though, it's good practice to have someone who reviews your changes. That way, they can point out things that you might have overlooked or things to make your code better.
Creating a branch
A branch allows you to work on your own version of the code, without anyone working on top of you. The branch where the current "final" code lives is generally named main. This is the branch that gets put it for users to use, etc.
To create your own branch, you need to start on the branch that you want to branch off of. Your new branch will be a copy of this branch at this moment in time. You almost always want to branch off of the latest code on main — not someone else's branch.
To create your branch, switch you current branch in Git to main and then download ("pull") any new changes that might've been added to main since you last pulled changes. The "change branch" command is named, somewhat non-obviously, "checkout".
Then, create your new branch with git checkout again — the -b flag tells Git "it's okay to make a new branch since this doesn't exist already". Name your branch something short, descriptive, and catchy. I like to prefix it with my name so I don't collide with other people's branch names.
git checkout main # Changes branch to main
git pull # Pulls down latest changes on main
git checkout -b ben/add-login-page # Create your new branch off of main
When you checkout, Git will do its best to bring your "uncommitted" changes to the branch you switch to, so you can commit them there. If you don't want this, make sure to commit to your old branch before switching to main.
If you don't know what committing is, don't worry — we'll cover it in a moment.
Committing to your branch
Once you've made some changes to your code, it's time to create a commit. With Git, a commit is a small group of changes (possibly across different files). Every time you make a set of changes that kinda all relate, make a commit.
Think about them like save points in a video game, triggering whenever you make some progress. If your latest changes become overwhelming, you can revert to the previous code you committed (or any commit before that). But if your commits contain a huge number of changes, you won't have a very useful "save point" to revert to. (This metaphor is mediocre at best.)
There's two steps to committing changes:
- Staging
- Committing
You need to stage the files with changes that you want to commit, ready for the next commit. (Why do we have to do this? You could conceivably stage a few related files, commit, stage the rest of the files, and commit again — producing two commits containing different changes from different files.)
To stage files, use git add <filenames>:
git add a.js b.js folder/c.js
In practice, we almost always want to just stage everything, which we can do using this command:
git add . # The period means "everythig within this folder and its subfolders"
You can check which files you've staged using git status.
Next, you create a commit! Again, commits are bundles of changes across all the files you've just staged. Commits require you to write a message that quickly describes what changes you made. You provide that message using the -m flag.
git commit -m "Make text inputs red when invalid"
Just like that, you've made a commit! You can run git status again to make sure.
If you run git commit without the message all-in-one, you'll probably be dropped into the Vim text editor by default. It's kinda tricky to exit Vim.
Anyway just type your message into the Vim text editor (you'll see it come up in the editor) and then hit Escape to take your cursor out of the editing mode, then type :wq! (you should see the letters coming up at the bottom of the editor; wq means "write (save) and then quit" and the exclamation mark means you mean it).
Pushing your changes
Now your changes are committed to Git, but recall that Git is on your computer and GitHub is how you have other people use the same files in their own computers' Git. (The code flows from your computer's Git → GitHub for synchronization and fancy features like Pull Requests → back down to each of your teammates' computers.)
Believe it or not, Pull Requests are a feature made by GitHub (the company), not Git (the free and open source project).
Good idea GitHub!
To have your branch with its commits show up on GitHub dot com, you'll want to push your changes:
git push
# The first time, this will likely spit back
# a command that's `git push --set-upstream ...`.
# Just copy and run that, it's a one-time thing.
You push your changes up to GitHub from your computer, and pull your teammates' latest changes down from GitHub to your computer!
Testing your own changes
This is a great time to test your changes to make sure they work, before you open a pull request.
Run the code and click through your changes to make sure everything's working as expected. See if you can think of any edge cases and just try those, too.
Opening a PR on GitHub
Now that your code is 100% totally absolutely working, it's time for someone else to review your code.
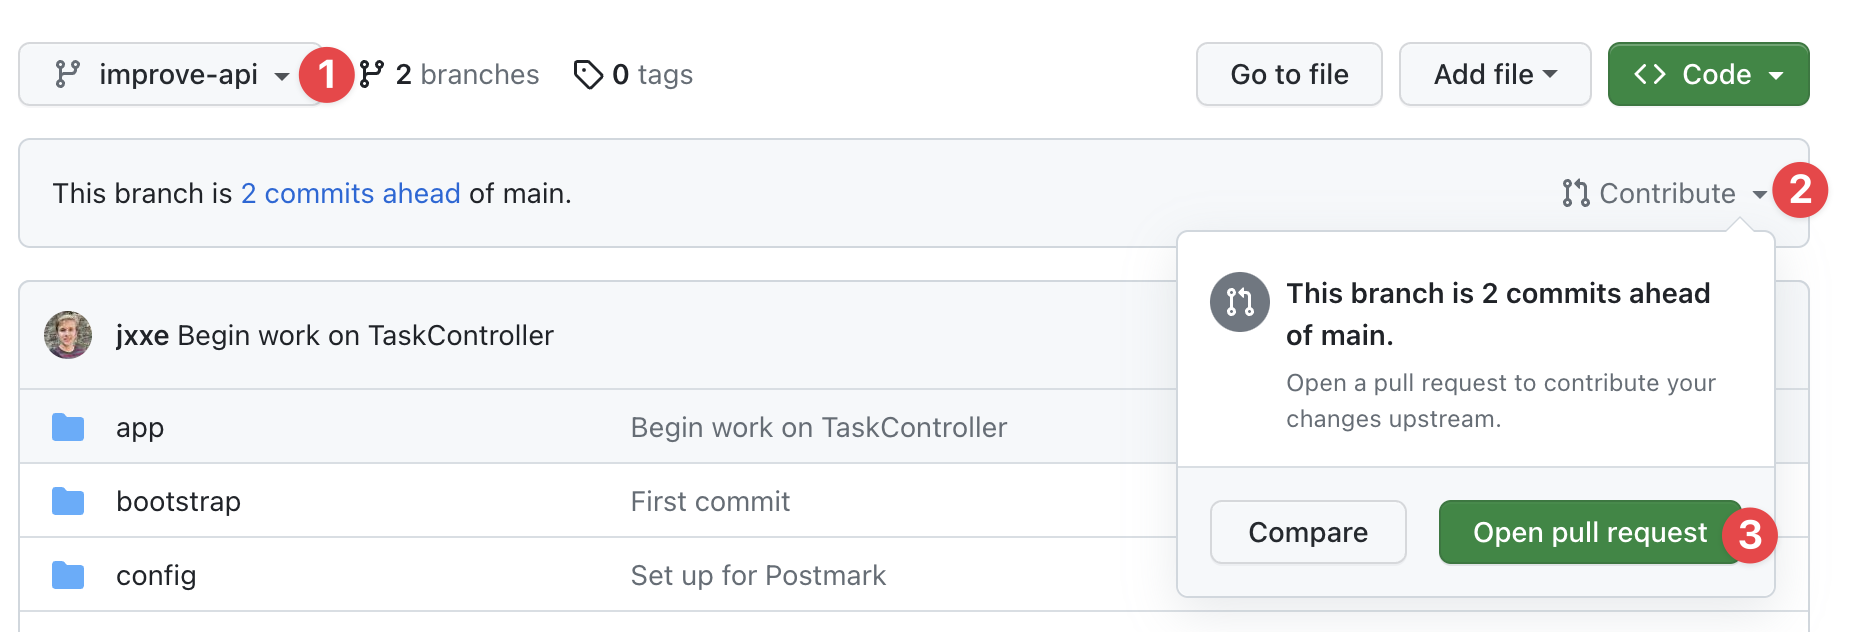
Open up your team's repository of code on GitHub's website. Switch to your branch (1), click "Contribute" (2), and then "Open pull request" (3).
If you've pushed lately then GitHub will give you a helpful yellow banner that only takes one-click to open a pull request, that's pretty nifty and does the same thing.
Fill out the description of your pull request with all the information someone else will need to review it: what the change does, maybe why you're doing it, and how they can test it on their computer.
In the upper-right part of the pull request, you can tag people who are gonna review your code, which sends them an email asking them to do it. Most likely this will be your Tech Lead and/or Project Manager! Go ahead and create the pull request!
Reviewing your own PR
Once you've created your pull request, I like to check the "Files changed" tab because it gives a really nice view of what you've added (green) and removed (red) from the code that's currently in main. It lets me catch anything that I've accidentally committed, and I can go back to my code and fix it + commit those changes to the same branch.
Even after opening a pull request, additional commits to the same branch will update the same pull request — no need to open another one! You should probably only ever need one pull request per branch.
Conducting a PR review (more commonly for Project Managers + Tech Leads)
You'll receive an email if you've been tagged as a reviewer. You can also bookmark this page that tells you all the pull requests that people are waiting for your review on: https://github.com/pulls/review-requested
To conduct your review:
- Switch to the "Files changed" tab of the pull request
- Add comments by hovering and clicking the blue plus button, then "Start review"
- Finalize the review by clicking "Review changes" above all the code. You should indicate whether you approve it or request further changes, and you can leave an overall note with wonderful words of encouragement.
Almost every pull request will probably have some requested changes — and that's okay! Pull requests are like the #1 way to become a better programmer; reviewers' feedback is invaluable and they don't hate you as a person if they request changes, they just have ideas of how to better structure/organize/document your code.
Re-requesting review
Once you get a review back, go through the changes and use your judgement on whether you want to make those changes. You can make them by doing the same thing as before: editing on your computer, then staging and committing to the same branch. The pull request's "Files changed" tab will update as expected.
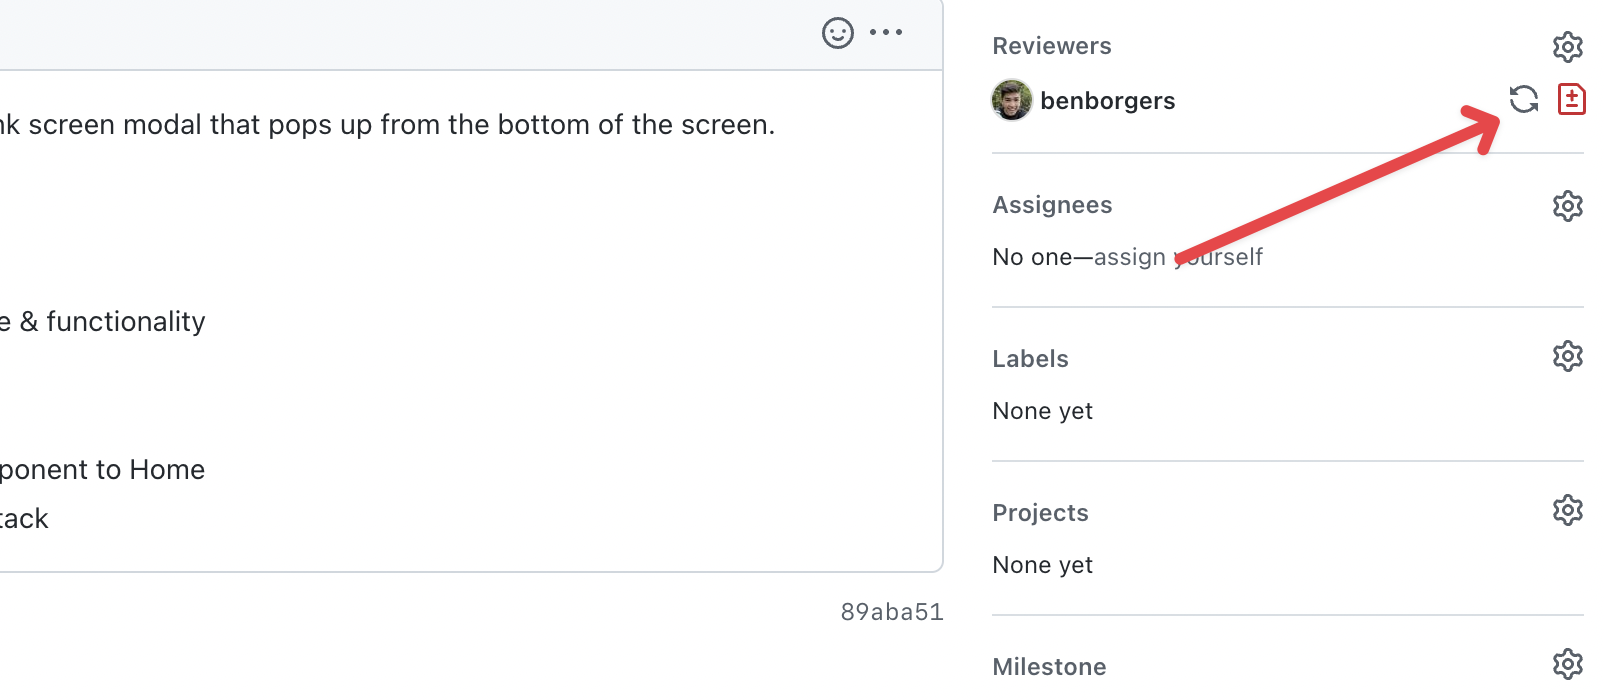
When you feel ready for another round of review, click this button next to each reviewer's name — that'll let them know that you're ready for them to take another look.
Merging
There might be several rounds of review, which is totally expected and okay!
After your reviewer(s) approve your pull request, you can go ahead and merge it into main using the big green button at the bottom of the pull request. If possible, change that button with the dropdown to say "Squash and merge" — that'll put your entire pull request into one big commit, which makes the history of commits really clean.